Step 1
Install your UUT into the pressure decay leak detection system.
Step 2
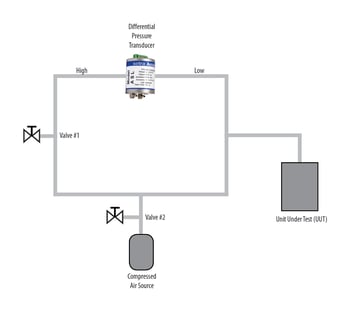
Set pressure control to desired test pressure for the application with both valves closed.
Step 3
In order to equalize the pressure levels within the system, make sure the pressure supply is applied to both sides of the differential pressure transducer. This is done by first opening valve #1 and then opening valve #2.
Step 4
After opening both valves, let the pressure stabilize within the system, which is verified by the display panel or data acquisition system (DAS).
Step 5
Next close valve #2. The differential pressure transducer should then read zero because the line pressure on both sides is equalized and at the pressure level set in Step 2.
Step 6
Close valve #1. This isolates the pressure between  the UUT and valve #1 on the high port of the differential pressure transducer from the reference port which is connected to the UUT.
Step 7
By reading the output of the differential pressure transducer, the change in pressure (if any) over a set period of time can be observed. The transducer measures the differential pressure between the high side of the system and the UUT. If a leak exists in the UUT, the transducer will read a pressure loss on the UUT side of the system. The operator or automated system can read the pressure decay in the system.
Setra's Model ASL, a high accuracy low differential pressure transducer, is a reliable solution for leak detection systems. The ASL's laser welded sensor construction, designed with positive and negative overpressure stops, enables the sensor to resist overpressure conditions up to 100X in all pressure ranges.
CLICK HERE to learn how to setup a pressure decay leak detection test.


